
Heavy equipment jobs
Final Drive Repair: Seals, Oil and Bearings
- 5 h
- Hard
- 9 steps
- 10 tools
- 5 parts
Snap yours and Mechy redraws these steps for it. First guide free, no sign-up.
Sample guide. A heavy-equipment mechanic hasn't reviewed this one yet, so search engines don't index it. Follow your machine's manual where they differ.
Short answer
Park, lock out and block the machine, pull the track, drain and read the final drive oil, remove the sprocket and cover, replace the duo-cone seal pair, check bearing play, reassemble to OEM torque and preload, refill to the level plug and leak test.
Safety first
Shop or dealer jobDo these before step 1.
- DANGERLock out before any hands-on work: implements down or blocked, engine off, key out, isolator off, tag on controls. Try the controls to prove them dead.
- DANGERBlock the machine on stands or cribbing rated for the load. Never work under it on hydraulics or a jack alone.
- WARNINGHeavy parts (track, sprocket, hub, over 23 kg / 50 lb): use rated lifting gear or two people. Keep fingers out of pinch points.
- WARNINGTrack grease is under pressure: open the relief valve slowly, face clear, never remove it. If the track will not slacken, stop.
- WARNINGRelieve hydraulic pressure before touching motor lines. Use cardboard to find leaks, never a hand.
- WARNINGGear oil can be hot and under pressure. Vent the level plug slowly, let it cool, wear gloves and eye protection.
- WARNINGBrake cleaner is flammable and harmful: ventilate, no ignition sources, gloves and eye protection.
- NOTICETorques, preloads and oil volumes come from the OEM manual for this model.
Stop and call a pro or the dealer if
- Oil had metal chunks or heavy glitter: gears or bearings are damaged, so teardown goes beyond a seal job.
- Bearings are rough, pitted or have play past the OEM limit.
- Seal bores or hub faces are scored or out of round.
- Leak is from the hydraulic motor, brake or gearbox housing: send it to a hydraulic shop.
- Oil is milky and the new seal does not cure it: motor shaft seal or housing damage.
Mechy's guides help, but they don't replace the maker's manual, your training or your site's rules. If something doesn't match what you see, stop and check.
Tools
Tick what you have. In the app, Mechy ticks the ones it can see in your photos.
Parts and supplies
- 1×Floating face seal (duo-cone) set, matched pairOEM part for this model, from parts bookCheck before you buy
- 1×Final drive gear oilOEM grade and volumeCheck before you buy
- 1×Cover O-ring or gasketOEMCheck before you buy
- 1×Thread lockeronly where OEM specifiesCheck before you buy Size chart
- 2×Drain/fill plug sealsOEMCheck before you buy
Steps
-
Step 1 of 9
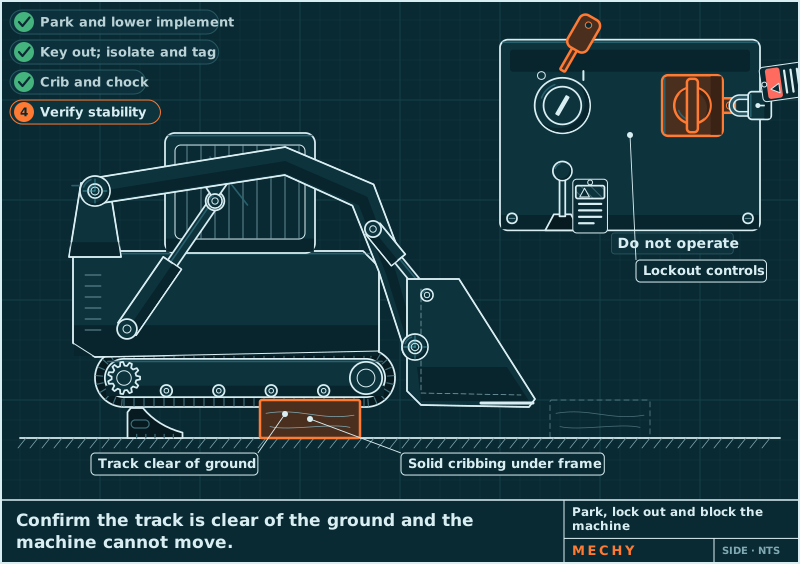
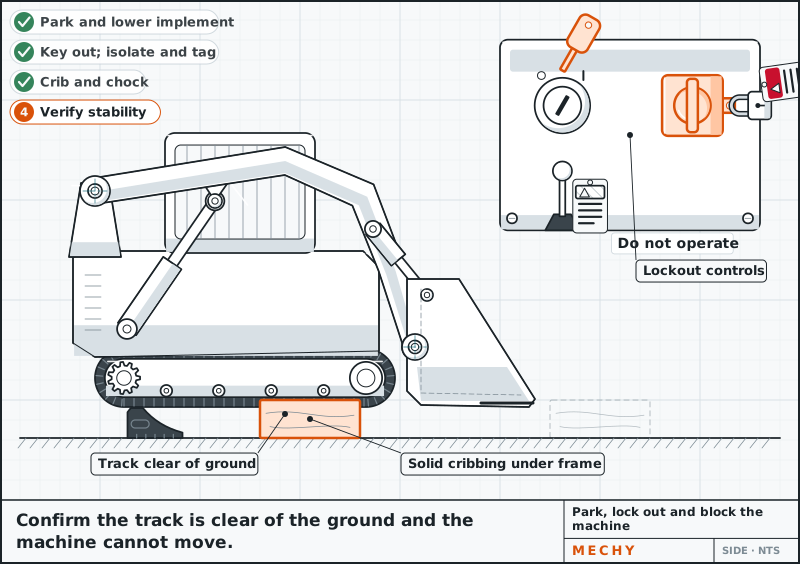
Park, lock out and block the machine
Park on level, firm ground. Raise that side only as far as needed (boom and blade on an excavator, as the manual says on a loader), crib the frame solid and lower it onto the cribbing. Implements down, engine off, key out, isolator off, tag on controls. Try the controls to prove them dead.
Never rely on hydraulics alone to hold it up.
Cribbing / stands and chocks
-
Step 2 of 9
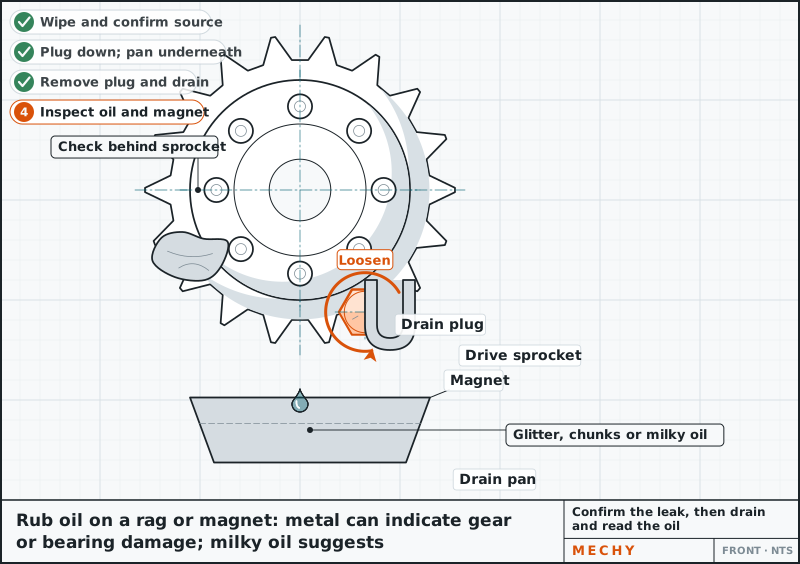
Confirm the leak, then drain and read the oil
Wipe the area and confirm oil comes from behind the sprocket, not the motor or a hose. Turn the drive so the drain plug is at the bottom. Crack the level plug to vent, then drain into a pan. Look for glitter, chunks or milky oil; check on a rag or magnet.
Heavy metal or chunks: stop and see the stop list.
Drain pan and magnet/clean white rag, Socket and wrench set
-
Step 3 of 9
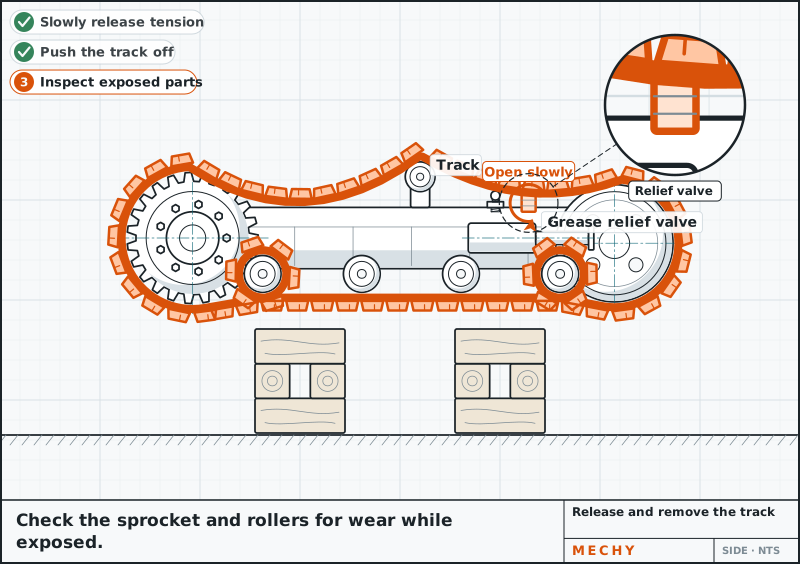
Release the track and remove it
Open the grease valve slowly, face clear, to slacken the track; do not remove the valve. Push the track off the sprocket and lay it clear, using lifting gear if heavy. Check sprocket and rollers for wear.
If the track will not slacken, stop: do not remove the valve or fitting.
Grease gun, Socket and wrench set, Lifting gear or sling
-
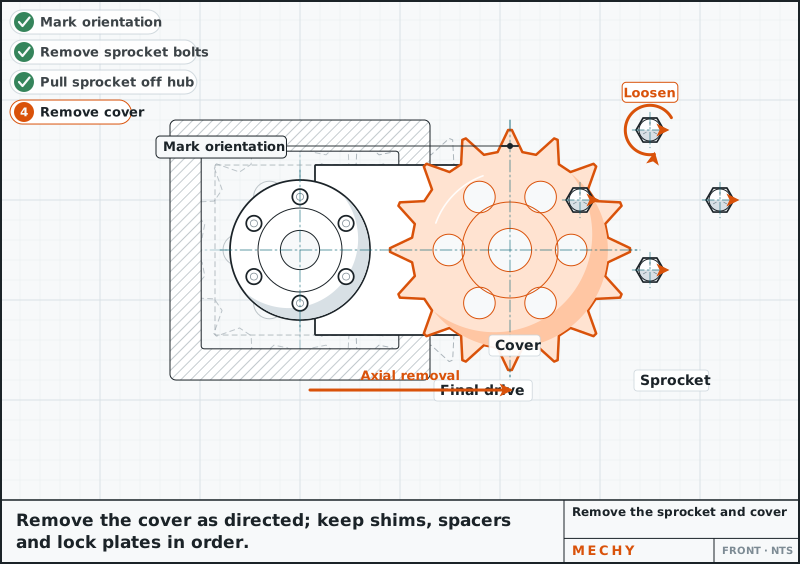
Step 4 of 9
Remove the sprocket and hub or cover
Mark sprocket orientation. Support the sprocket with a sling, take out the bolts and pull it. Remove the hub or cover as the manual says. Keep shims, spacers and lock plates in order and clean old thread locker from the threads.
The sprocket can drop when the last bolt is out: support it first.
Socket and wrench set, Lifting gear or sling
-
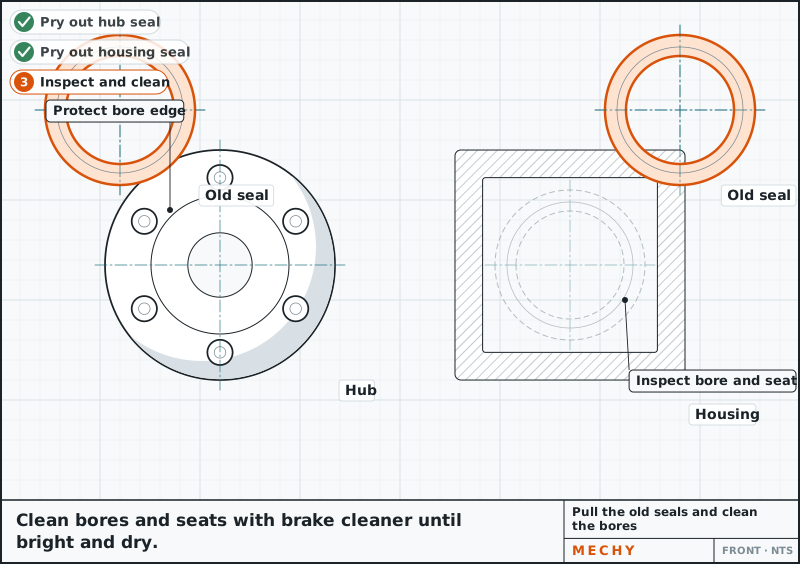
Step 5 of 9
Pull the old seals and clean the bores
Pry out both seal halves (hub and housing) without scoring the bores. Inspect for scoring, wear and cracks. Clean bores and seats with brake cleaner until bright, dry and residue-free. Dress only light burrs.
Any scoring in the bore means a new part or a shop.
Seal pick and pry bars, Brake cleaner and lint-free rags
-
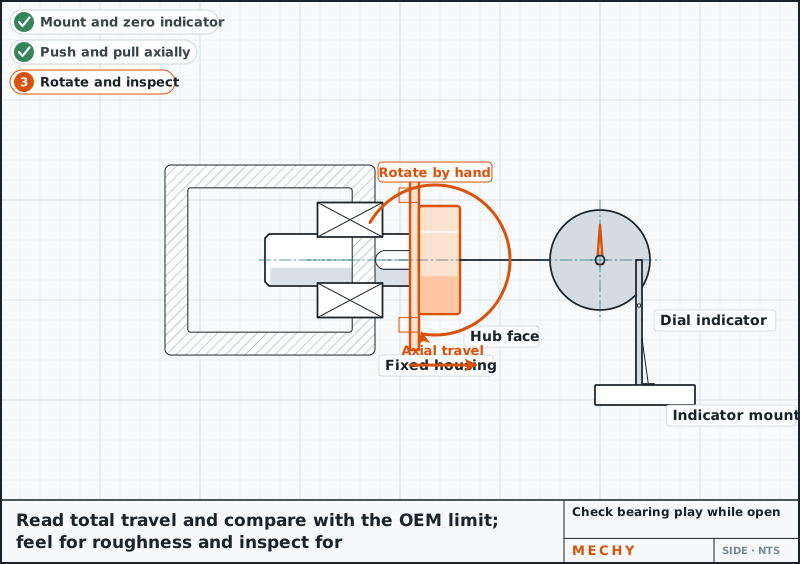
Step 6 of 9
Check bearing play while it is open
Fix a dial indicator to a stationary surface with the tip on the hub face. Push and pull the hub axially and read total travel against the OEM limit. Turn it by hand and feel for roughness or pitting.
Bearing end play: per OEM manual Check it against your manual.
Dial indicator with magnetic base
-
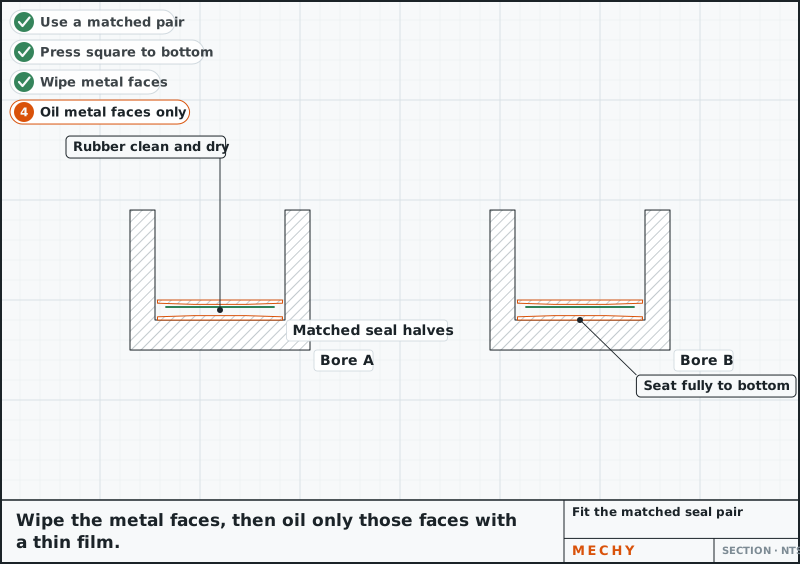
Step 7 of 9
Fit the new seal pair with the tool
Use a matched pair only. Keep rubber rings clean and dry, no oil. Seat each half square with the tool until it bottoms; check the gap is even all round. Wipe the metal faces, touching them only by the edges, then add a thin oil film on the metal faces only.
Oil or dirt on the rubber lets the seal spin in the bore and leak again.
Seal installation tool, Brake cleaner and lint-free rags
-
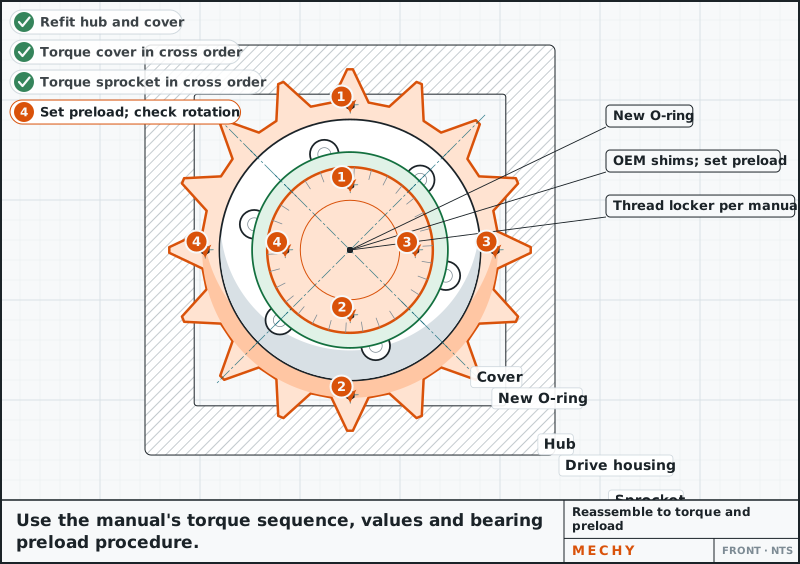
Step 8 of 9
Reassemble to torque and preload
Refit hub, cover with a new O-ring, and sprocket with OEM shims. Use thread locker only where the manual calls for it. Torque in a star pattern and set bearing preload per the manual. The hub must turn by hand without drag or roughness.
Torque / preload: per OEM manual Check it against your manual.
Torque wrench
-
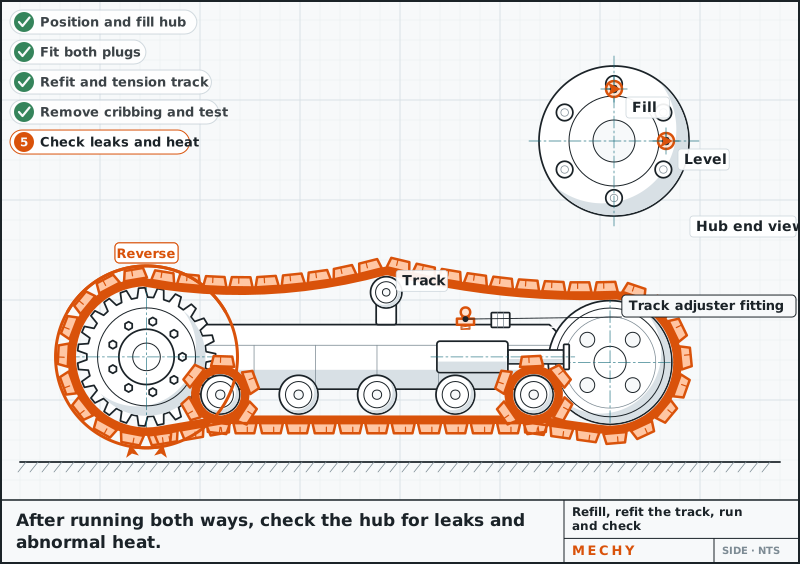
Step 9 of 9
Refill, refit the track, run and check
Turn the hub so the level plug is at level position and fill to it, then fit plugs with new seals. Refit the track and set tension. Lower the machine off the cribbing, clear bystanders, run both ways, check leaks and heat, and recheck after first use.
Keep people clear of the tracks during the test run.
Gear oil: OEM grade, to level plug Check it against your manual.
Grease gun, Socket and wrench set


Common mistakes
- Putting oil on the rubber rings of the seal instead of only the metal faces.
- Fitting one new half against an old half instead of a matched pair.
- Cocking the seal in the bore because the installation tool was not used.
- Skipping the drain inspection and missing glitter that points to bearing or gear damage.
- Opening the track grease valve fast or removing it, instead of releasing it slowly.
Questions
How do I know the final drive seal is leaking?
Oil weeps from behind the sprocket and the hub is wet or the level drops. Wipe it clean and rule out the motor and hoses before pulling anything apart.
Can I reuse a duo-cone seal?
No. Fit a new matched pair. Reused halves lose their lapped fit and usually leak again.
What does milky final drive oil mean?
Water has entered, usually past a failed seal. If a new seal does not cure it, check the motor shaft seal and housing.
Why must the rubber rings be dry?
Oil on the rubber lets the seal turn in its bore, which ruins the seal and leaks again.
When does the job go to a hydraulic shop?
When the oil shows metal chunks, bearings are rough or loose, bores are scored, or the leak comes from the motor, brake or gearbox.
Updated
Different machine? Snap yours.
Mechy reads the machine and the part from your photo and redraws the steps, tools and parts for it.
First guide free. No sign-up, no card.