
Heavy equipment jobs
How to Replace a Skid Steer Track
- 2 h
- Intermediate
- 10 steps
- 9 tools
- 2 parts
Snap yours and Mechy redraws these steps for it. First guide free, no sign-up.
Sample guide. A heavy-equipment mechanic hasn't reviewed this one yet, so search engines don't index it. Follow your machine's manual where they differ.
Short answer
Replace a rubber track on a compact track loader: park and chock, raise the side and set stands, lock out, release tensioner grease safely, remove the old track, inspect the undercarriage, fit the new track, tension to the manual and recheck after running.
Safety first
Specialist task: trained techs onlyDo these before step 1.
- DANGERNever work under or beside a side held only by lift arms, bucket or a jack. Set it on stands rated for the machine and check it is stable.
- DANGERTensioner grease is under very high pressure. Open the relief valve slowly, stand to the side, never remove the valve or fitting. Injection injury: ER now.
- DANGERStored hydraulic pressure: after shutdown, relieve it as the manual says. Never feel for leaks by hand; use cardboard.
- WARNINGLockout/tagout once the side is on stands: bucket down or supported, engine off, key out, isolator off, tag on the controls.
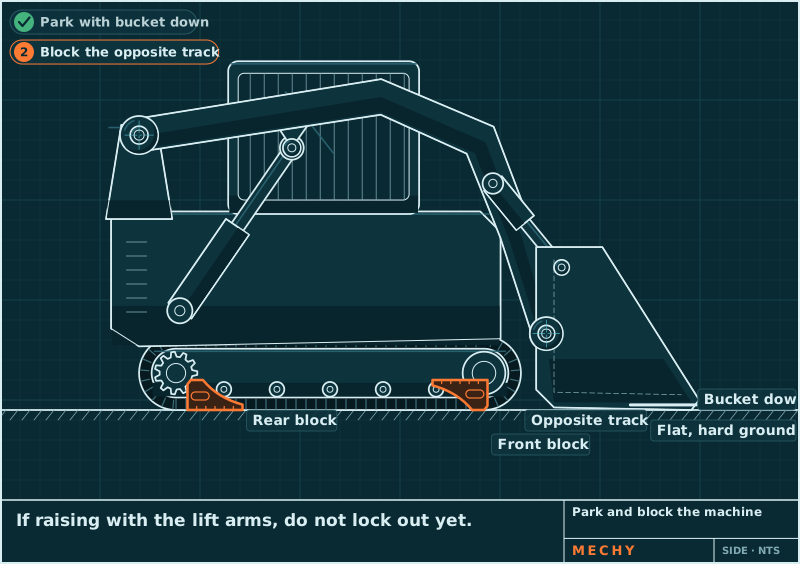
- WARNINGWork on flat, hard ground. Block the other track fore and aft. Keep hands out of the idler and sprocket pinch points.
- WARNINGA rubber track is heavy and can drop suddenly: support it with a strap or hoist and keep your body out from under it.
- WARNINGWear gloves, eye protection and steel-toe boots.
- NOTICESpecs here are starting points: verify against the OEM manual.
Stop and call a pro or the dealer if
- Call the dealer if the tensioner will not release, leaks grease past the seals, or the idler will not move.
- Stop if the sprocket, rollers or idlers are worn past limits or cracked, or if the frame is damaged.
- Stop if the machine is not stable on the stands.
Mechy's guides help, but they don't replace the maker's manual, your training or your site's rules. If something doesn't match what you see, stop and check.
Tools
Tick what you have. In the app, Mechy ticks the ones it can see in your photos.
Parts and supplies
- 1×Rubber trackSize and pitch per machine data plate and manualCheck before you buy
- 1×Tensioner greasePer OEMCheck before you buy
Steps
-
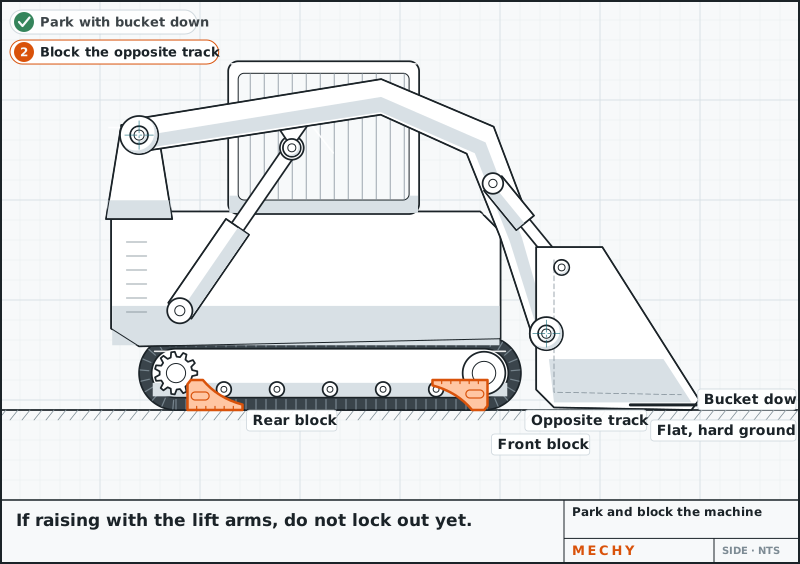
Step 1 of 10
Park and block the machine
Park on flat, hard ground with the bucket down. Block the opposite track fore and aft. Do not lock out yet if you will raise with the lift arms.
Track blocks or chocks
-
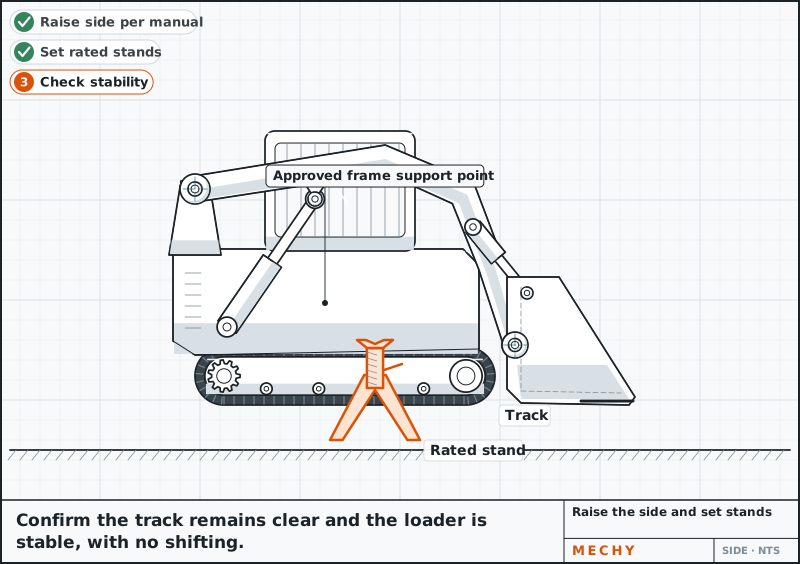
Step 2 of 10
Raise the side and set stands
Raise the side as the manual says. Set rated stands under the frame so the track is clear of the ground. Lower onto them and check it is stable and not shifting.
Never rely on hydraulics or a jack alone.
Jack stands, Lift method per manual
-
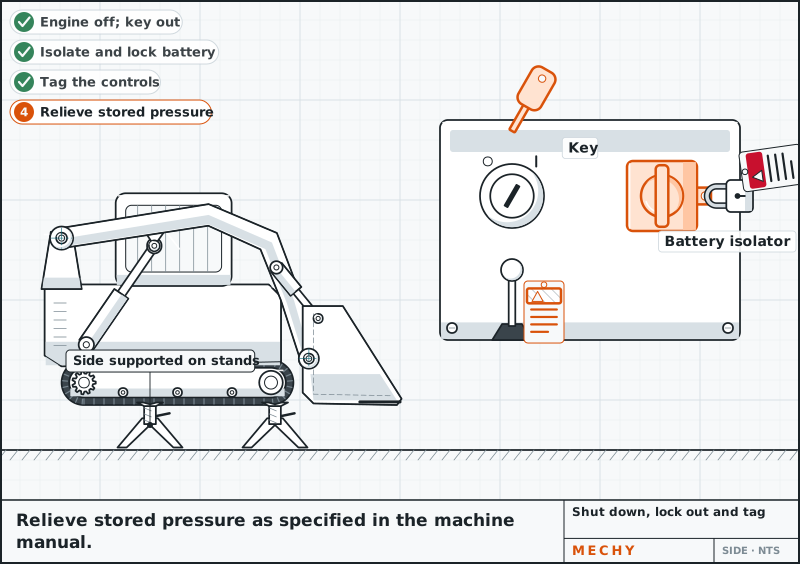
Step 3 of 10
Shut down, lock out and tag
With the side on stands: engine off, key out, battery isolator off, tag on the controls. Relieve stored pressure as the manual says.
-
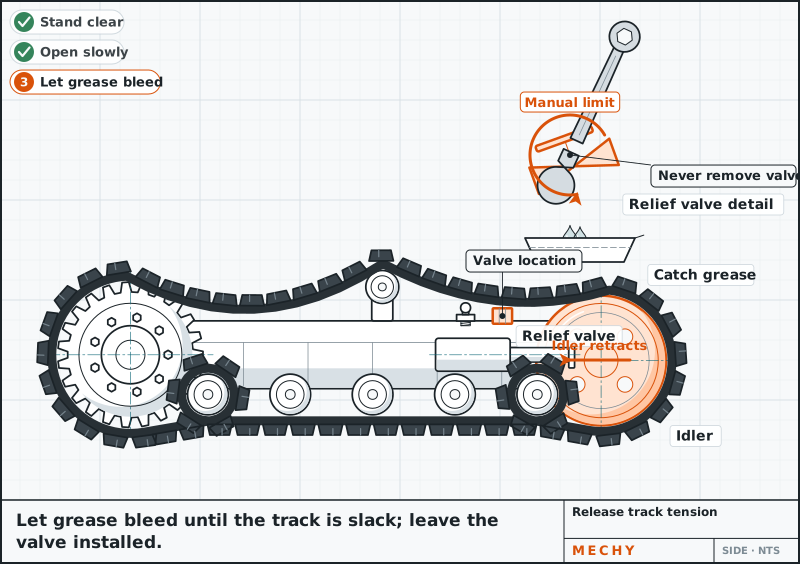
Step 4 of 10
Release track tension
Stand to the side, face clear. Slowly open the relief valve only as far as the manual says and let grease bleed until the track is slack. Never remove the valve or fitting.
Grease injection injury: keep face and hands clear.
Wrench for relief valve, Cardboard
-
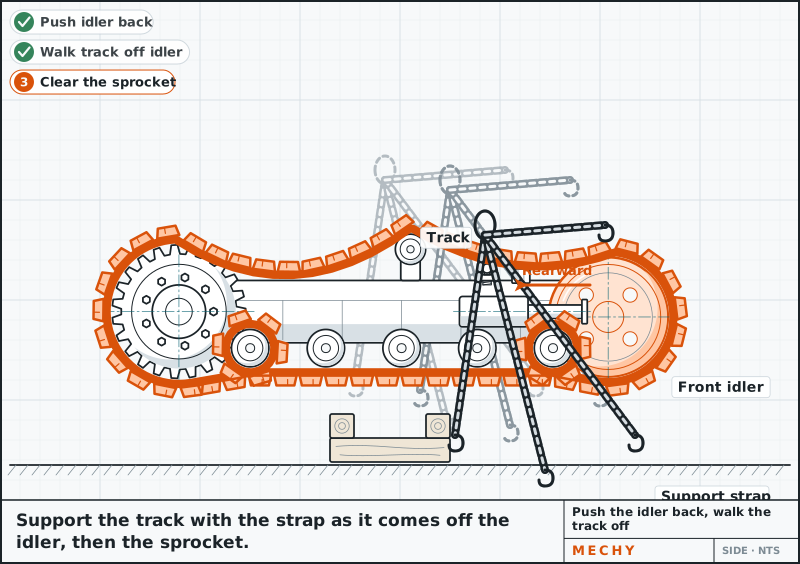
Step 5 of 10
Push the idler back, walk the track off
Push the front idler fully back with the pry bar. Walk the track off the idler, then the sprocket, supported by a strap or hoist. Keep clear of the falling track.
Heavy track: keep your body out from under it.
Pry bar, Lifting strap or hoist
-
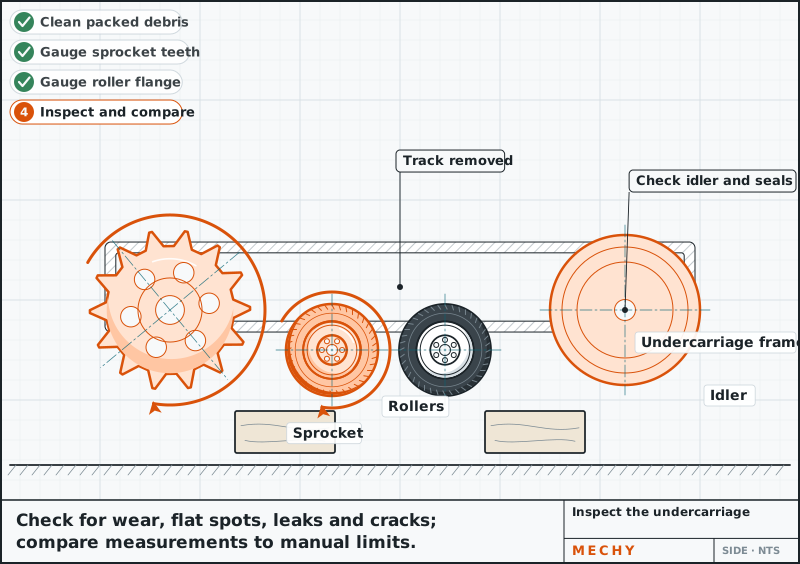
Step 6 of 10
Inspect the undercarriage
With the track off, check sprocket teeth, rollers and idlers for wear, flat spots, leaks and cracks. Compare to the manual limits. Clean out packed debris.
Wear limit: per OEM manual Check it against your manual.
Wear gauge or tape measure
-
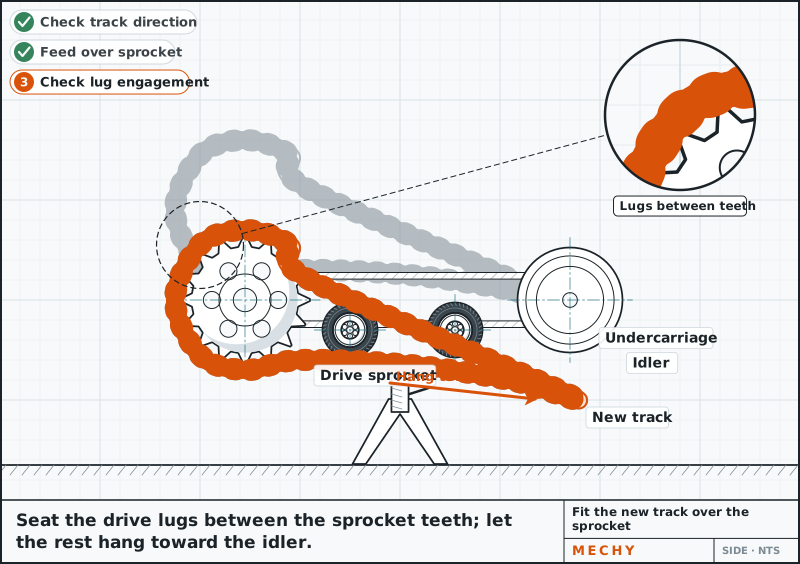
Step 7 of 10
Fit the new track over the sprocket
Check the direction arrows or tread pattern. Feed the track over the sprocket first so the drive lugs engage the teeth, and let the rest hang toward the idler.
Lifting strap or hoist
-
Step 8 of 10
Lever it over the front idler
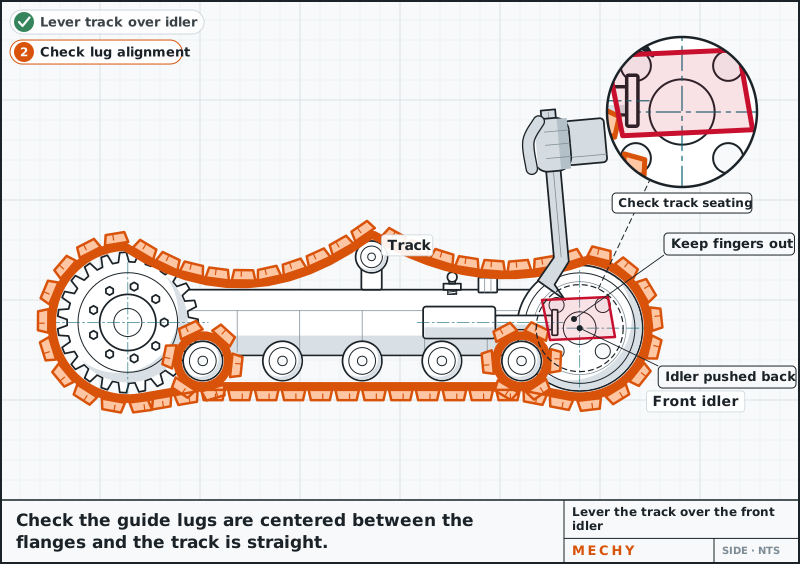
With the idler pushed back, lever the track over it with the pry bar. Keep fingers out of the gap. Check the guide lugs sit centered between the roller flanges and the track is straight on the idler.
Keep hands clear of pinch points.
Pry bar
-
Step 9 of 10
Re-tension with the grease gun
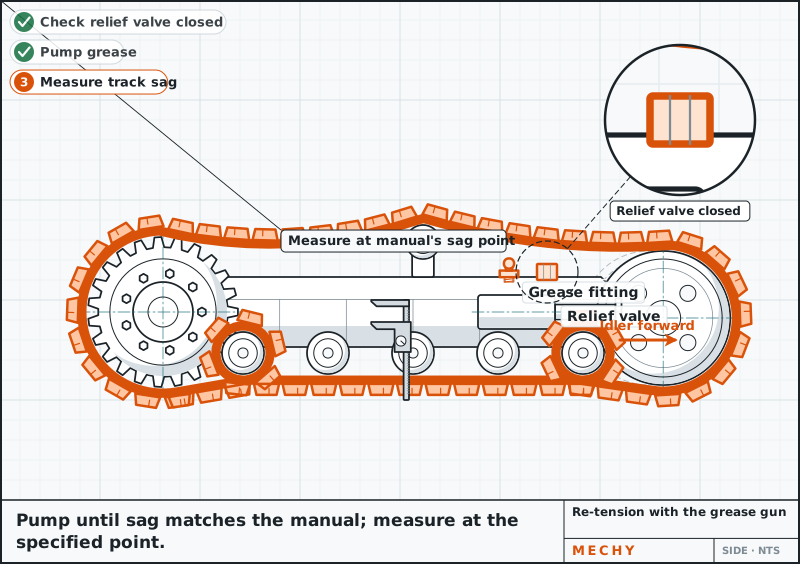
Check the relief valve is closed. Pump grease in until the sag matches the manual, measured at the specified point.
Track sag: per OEM manual Check it against your manual.
Grease gun, Wear gauge or tape measure
-
Step 10 of 10
Lower, run and recheck
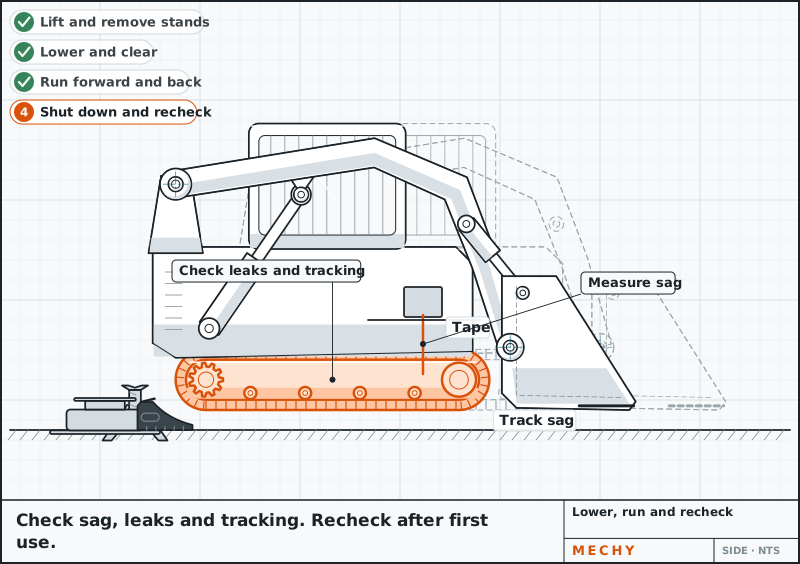
Clear tools and people, remove the lockout, lift the side slightly the way you raised it, pull the stands and lower it. Remove the blocks, run back and forth a few meters, shut down and recheck sag, leaks and tracking. Recheck after the first hours of work.
Wear gauge or tape measure


Common mistakes
- Working under a side held only by the lift arms or a jack instead of on stands.
- Taking out the relief valve or grease fitting instead of opening it slowly, causing a grease injection injury.
- Fitting the track backward or off-center on the idler.
- Skipping the undercarriage inspection and putting a new track on worn sprockets or idlers.
- Not rechecking the sag after running the machine.
Questions
How do you release track tension on a skid steer?
Stand to the side and slowly open the grease relief valve as the manual says. Let grease bleed until the track is slack. Never remove the valve or fitting, since the grease is under very high pressure.
How tight should a skid steer track be?
Set the sag to the figure in your service manual, measured at the point it specifies. Too tight wears bearings and sprockets, too loose can throw the track.
Can I change a track without lifting the machine?
No. The side must be raised and held on rated stands so the track is clear of the ground and slack.
How long does a skid steer track change take?
About two hours for one track for an experienced mechanic, longer if the undercarriage needs work.
Updated
Different machine? Snap yours.
Mechy reads the machine and the part from your photo and redraws the steps, tools and parts for it.
First guide free. No sign-up, no card.