
Heavy equipment jobs
How to Repair a Hydraulic Hose or Fix a Leak
- 1 h
- Easy
- 9 steps
- 10 tools
- 4 parts
Snap yours and Mechy redraws these steps for it. First guide free, no sign-up.
Sample guide. A heavy-equipment mechanic hasn't reviewed this one yet, so search engines don't index it. Follow your machine's manual where they differ.
Short answer
Find the leak with cardboard at idle, then shut down, lock out and relieve pressure. Clean, then replace the whole hose assembly using two wrenches, matching dash size, fittings and length. Fit untwisted, tighten, clamp, and test at idle.
Safety first
Specialist task: trained techs onlyDo these before step 1.
- DANGERNever check a leak with a hand. Pinhole sprays inject oil into skin. Use cardboard and a face shield. Injection injury needs a hospital now.
- DANGERStored energy: accumulators and trapped lines hold pressure after shutdown. Relieve per the OEM procedure before opening any line.
- DANGERLockout/tagout: attachments on the ground, engine off, key out, battery isolator off, tag on the controls.
- DANGERBlock or crib anything raised. Never work under a boom or bucket held only by hydraulics or a jack.
- WARNINGHot oil burns. Let the system cool, wear gloves and eye protection, and crack fittings slowly with a rag over them.
- WARNINGHeavy parts: use rated lifting gear or a two-person lift. Keep fingers out of pinch points.
- WARNINGClamps, tape, or splices on a pressure hose are not a repair. Replace the whole assembly.
- NOTICEAll torque and flat values here are starting points. Verify against the OEM manual or the fitting maker's chart.
Stop and call a pro or the dealer if
- You can't identify the hose rating or fitting type with confidence.
- A hose or fitting leaks again after correct tightening or reseating.
- Threads, ports or the adapter are cracked, stripped or damaged.
- The leak is in a rigid line, cylinder, pump or valve rather than a hose or fitting.
- Anyone has oil injected under the skin: go to emergency care immediately.
Mechy's guides help, but they don't replace the maker's manual, your training or your site's rules. If something doesn't match what you see, stop and check.
Tools
Tick what you have. In the app, Mechy ticks the ones it can see in your photos.
Parts and supplies
- 1×Hydraulic hose assemblyMatch old hose: dash size, pressure rating (equal or higher), end typesCheck before you buy
- 2×ORFS O-rings (if ORFS)Size to suit face-seal fitting, correct materialCheck before you buy
- 2×Hose support clamps / protective sleeveTo suit hose ODCheck before you buy
- 1×Hydraulic oilPer OEM spec; top up onlyCheck before you buy
Steps
-
Step 1 of 9
Find the leak with cardboard
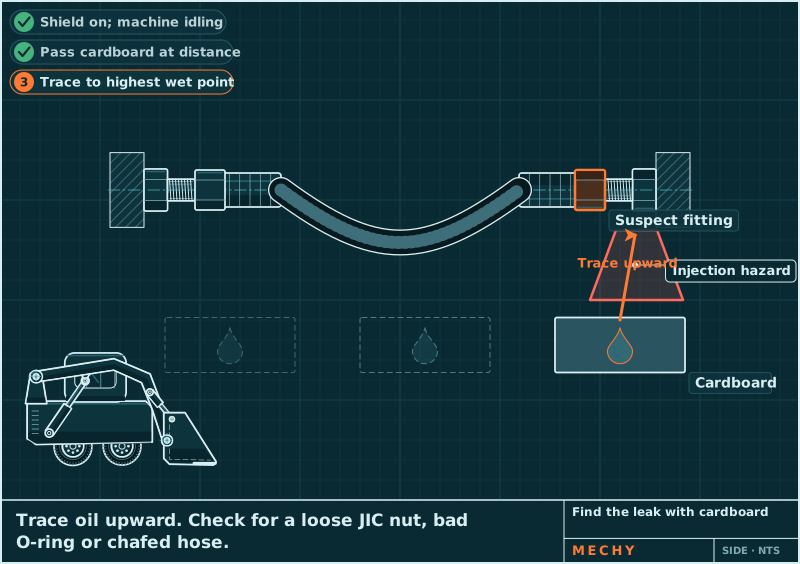
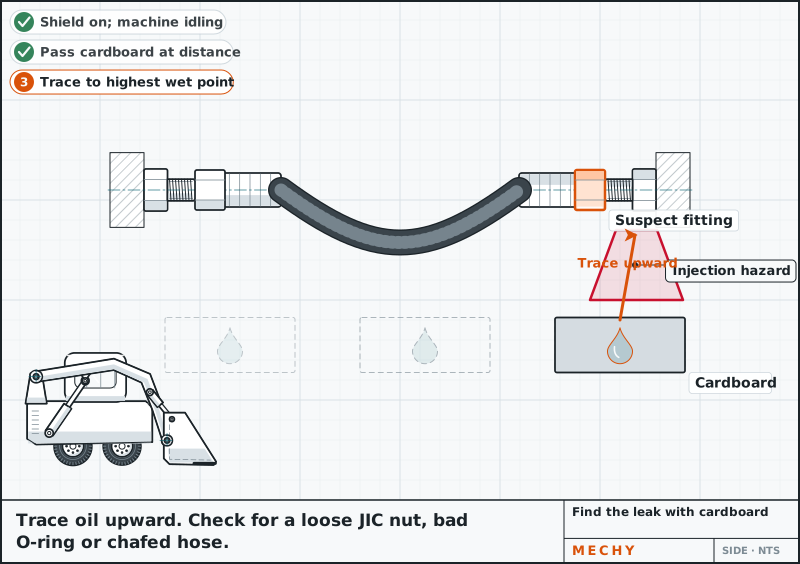
With a face shield on, idle the machine and pass cardboard near the suspect hose and fittings from a distance. Never use a hand. Trace oil to its highest wet point. Look for a loose JIC nut, bad O-ring or chafed hose.
Keep face and hands away from any spray.
Cardboard sheet, Face shield and gloves
-
Step 2 of 9
Lock out and block the machine
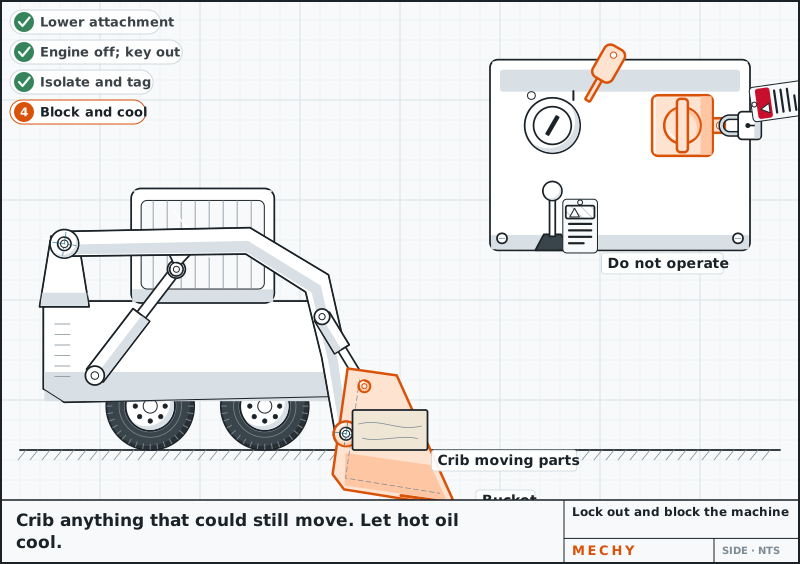
Lower the boom and attachment to the ground. Engine off, key out, isolator off, tag on controls. Crib anything that could still move. Let hot oil cool.
Never rely on hydraulics alone to hold anything up.
Chocks/cribbing
-
Step 3 of 9
Relieve pressure and clean the fittings
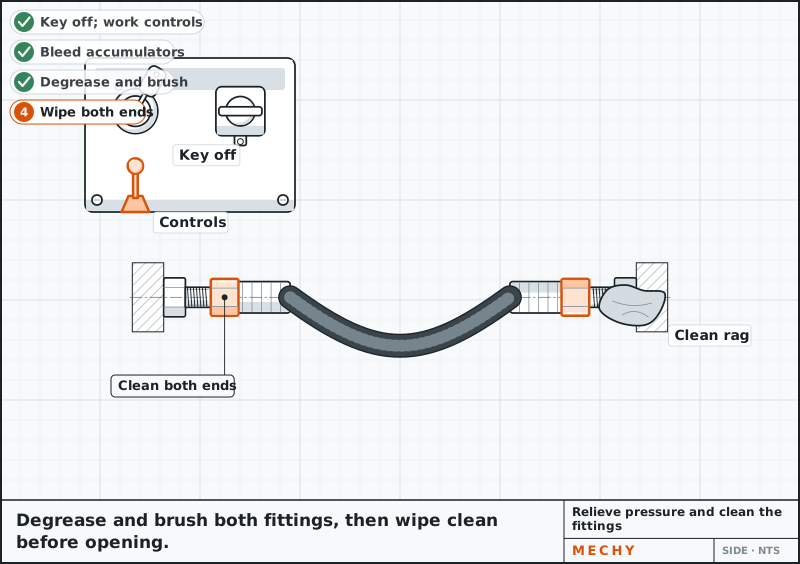
Release tank pressure per the manual. With the engine off, work all controls and auxiliary both ways. Bleed accumulators per the manual. Degrease and brush both ends so no dirt enters the open lines.
Dirt is what kills hydraulic systems.
Brush, degreaser, lint-free rags
-
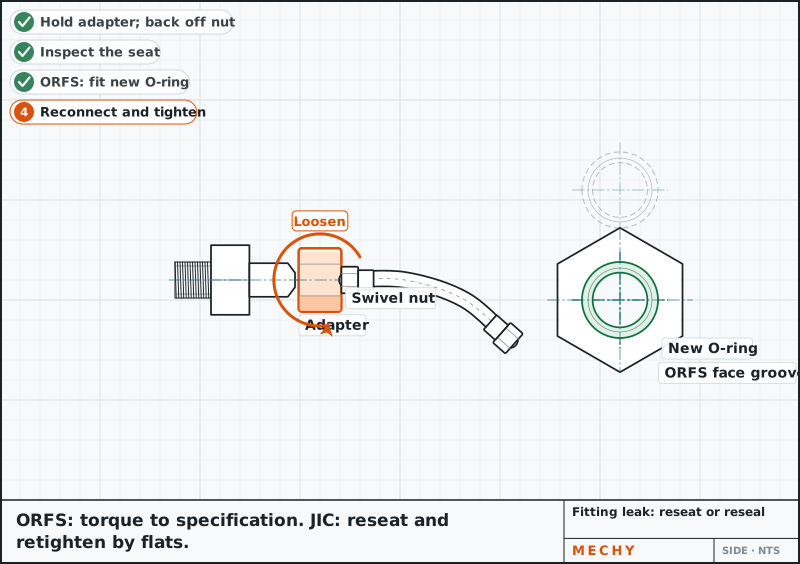
Step 4 of 9
Fitting leak only: reseat or reseal
If only a fitting weeps, back off the nut with a backup wrench and inspect the seat. JIC: wipe, reseat and retighten by flats. ORFS: new O-ring, then torque to chart. Cracked or scored seat: replace the hose or adapter.
Never re-use a damaged O-ring.
Reseat: Flats or torque per fitting chart Check it against your manual.
Flare-nut or open wrench set, Torque wrench
-
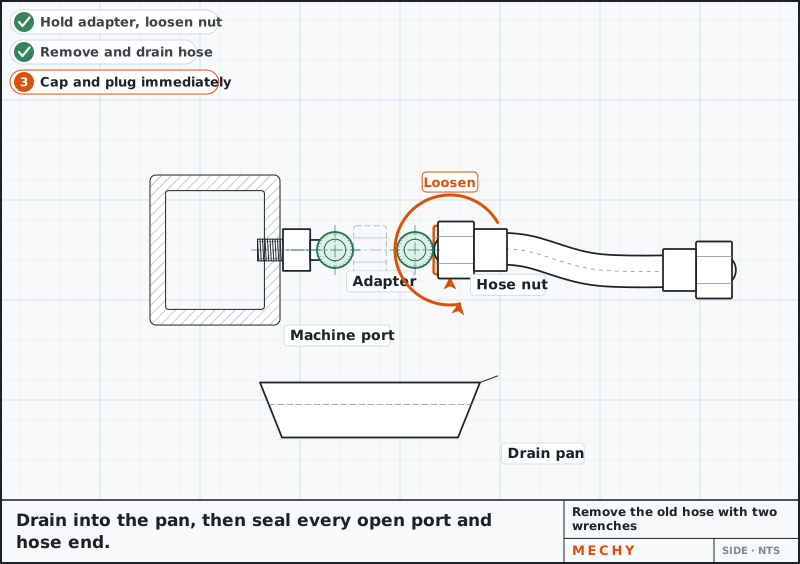
Step 5 of 9
Remove the old hose with two wrenches
Put a backup wrench on the adapter and turn the hose nut counter-clockwise with the second wrench. Drain into a pan. Cap or plug every open hose end and port straight away.
Without a backup wrench, you can twist the adapter and start a new leak.
Flare-nut or open wrench set, Drain pan and rags, Port plugs and caps
-
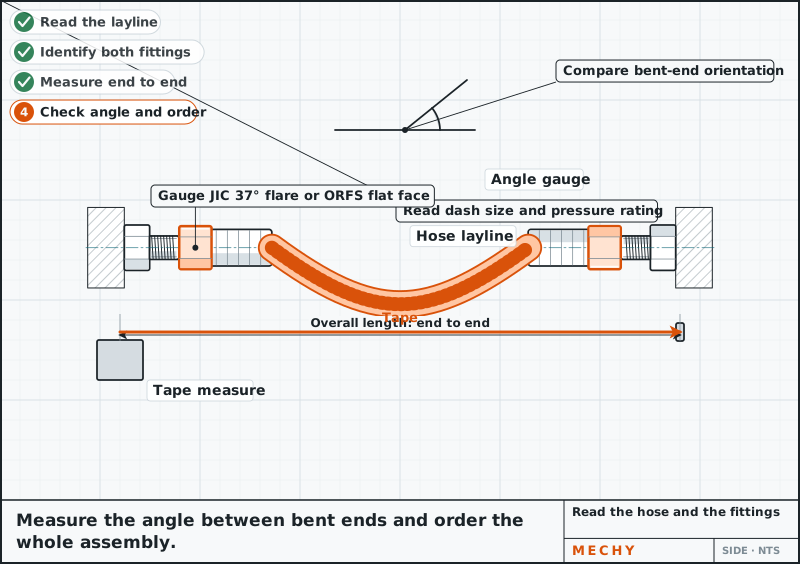
Step 6 of 9
Read the hose and the fittings
Read the layline for dash size, pressure rating and hose type (e.g. -8 = 1/2 in). Identify JIC (37° flare) or ORFS (flat face, O-ring) and thread with gauges. Measure overall length and the angle between bent ends. Order the whole assembly.
Rating: Equal to or above original working pressure Check it against your manual.
Thread pitch gauge and cone/seat gauge, Tape measure and angle finder
-
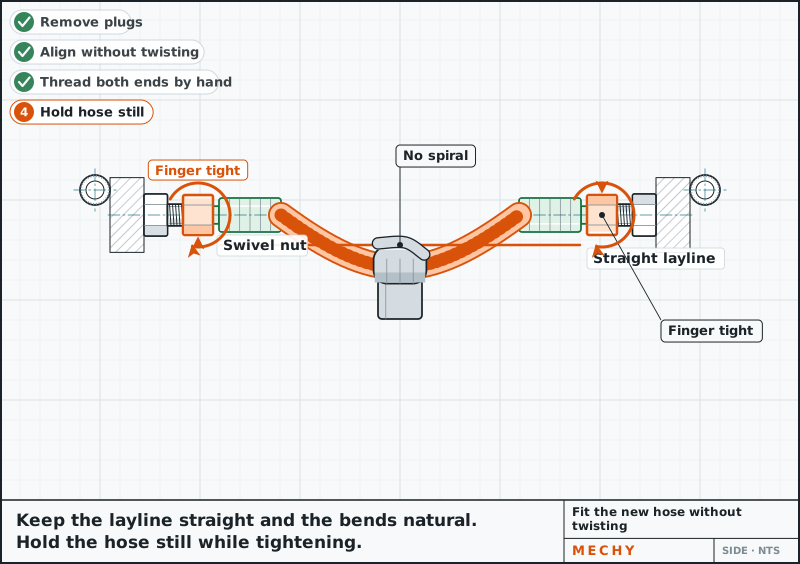
Step 7 of 9
Fit the new hose without twisting
Remove the plugs. Check that the layline runs straight, with no spiral. Thread both ends finger tight, aligning bends so the hose lies naturally. Hold the hose still while you tighten.
A twisted hose can fail early or loosen fittings.
Flare-nut or open wrench set
-
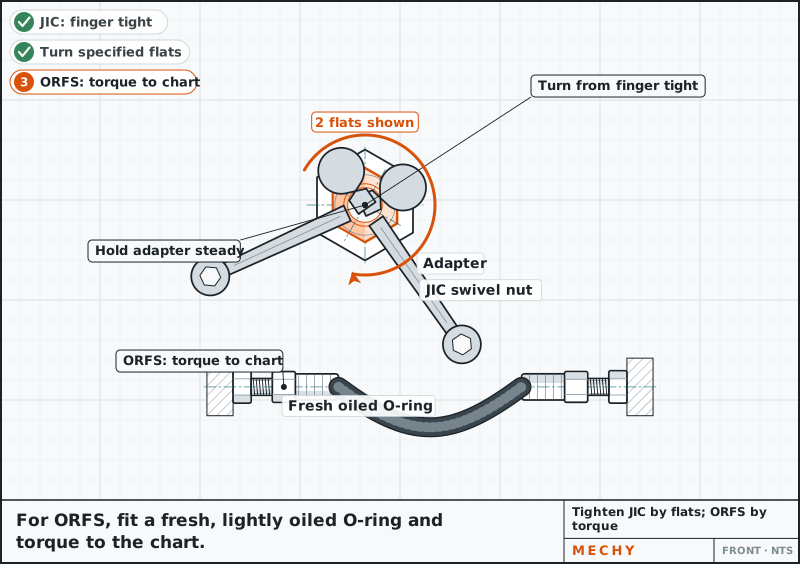
Step 8 of 9
Tighten: JIC by flats, ORFS by torque
JIC: from finger tight, turn the nut the flats listed in the fitting chart, with a backup wrench on the adapter. ORFS: use a fresh, lightly oiled O-ring and torque to the chart.
JIC tightening: Flats from finger tight: see the fitting chart Check it against your manual.
Flare-nut or open wrench set, Torque wrench
-
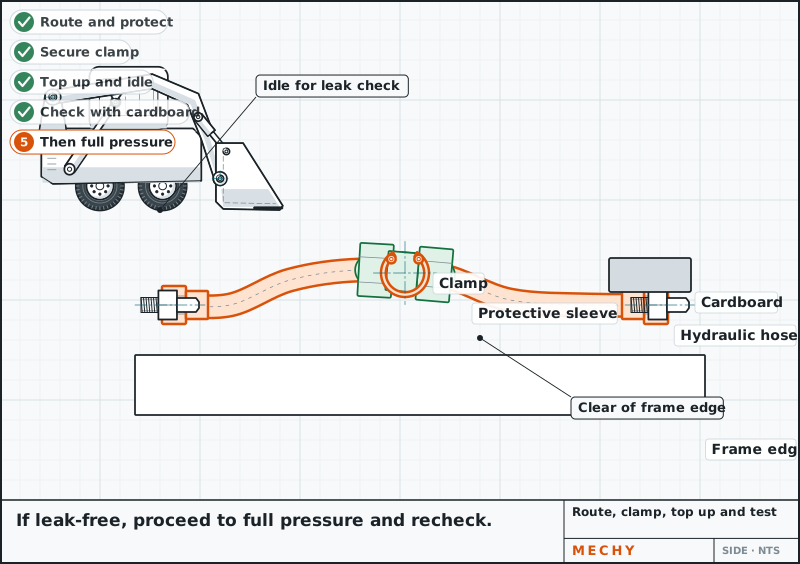
Step 9 of 9
Route, clamp, top up and test
Route away from rub points, edges, heat and moving joints, with a gentle bend and slack. Clamp and sleeve as needed. Top up oil, start and idle, cycle slowly, check with cardboard, then full pressure. Recheck the level and fittings after a run.
Stop and shut down if any weep appears.
Cardboard sheet, Hose support clamps / protective sleeve


Common mistakes
- Checking for leaks with a bare hand instead of cardboard.
- Opening a line without relieving pressure first.
- Skipping the backup wrench and twisting the adapter.
- Installing the hose twisted or with the wrong bend angle.
- Leaving ports uncapped so dirt gets into the system.
Questions
Can I repair a hydraulic hose with a clamp or splice?
No. Clamps, tape and splices on a pressure hose are not a repair. Replace the whole hose assembly with one that matches the original rating and fittings.
How do I find a hydraulic leak safely?
Use cardboard and a face shield, and keep your hands and face away. Pinhole sprays can inject oil under the skin, which is a medical emergency.
What is the difference between JIC and ORFS fittings?
JIC seals on a 37 degree flare metal to metal. ORFS seals with an O-ring in a flat face. Check with a seat gauge before ordering.
What does -8 mean on a hydraulic hose?
The dash size is the hose inside diameter in sixteenths of an inch, so -8 is 1/2 in. Read it and the pressure rating from the layline.
Why does a new fitting still leak?
Usual causes are a twisted hose, a damaged seat, a reused or wrong O-ring, or under- or over-tightening. Shut down, relieve pressure and recheck.
Updated
Different machine? Snap yours.
Mechy reads the machine and the part from your photo and redraws the steps, tools and parts for it.
First guide free. No sign-up, no card.